- How to Grow Pea Shoots Indoors -
Pea shoots are my absolute favourite food to grow indoors! The taste may vary, depending on the seed used. But I would describe the taste as a cross between fresh, young peas and spicy radish sprouts.
Pea shoots are easy to grow indoors, as they grow quickly (ready for first harvest after two weeks). They don't need as much light as many vegetables do. They're fairly tolerant of cooler temperatures, which makes them perfect for growing indoors near a window in the winter. I grow my indoor vegetables in a mudroom/entrance room that is poorly insulated, and can get very cool in the winter. I have a shelf unit, and hang window plastic around the lower three shelves, leaving the top shelf open. The plastic protects the plants a little from the cold window air.
Do you need to purchase sprouting seeds, or can you use regular pea seeds, or dried peas?
I've purchased organic sprouting seeds, and I've grown shoots from dried snap peas from my garden. I don't recommend using regular pea vegetable seeds to grow pea shoots. If you're going to buy seed, the literature suggests only using organic pea seeds that say they are for sprouting or for pea shoots.
Should you soak the pea seeds before planting?
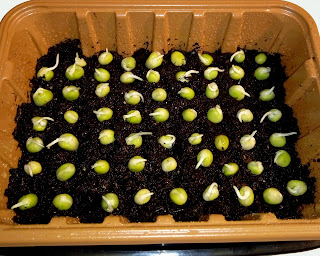
I recommend soaking the seeds before planting; and then draining and rinsing them for a few days until they have sprouted; and then planting in soil. I've planted them directly in the soil also, but prefer soaking first for the following reasons:
- When you soak, drain, and rinse the seeds before planting, you can see which ones have sprouted and which ones haven't. I only plant the ones that have sprouted to ensure a higher yield. You can leave the unsprouted seeds a day or two longer to see if they will sprout, but they will go moldy if left too long.
- When you plant the seeds directly in the soil, the initial sprouting tends to make the seeds pop right out of the soil. You can put a weight on them until the sprouts get a little bigger to prevent this.
Day 1: I started the seeds on January 22, soaking them overnight in water in a mason jar.
Day 2: I drained and rinsed the seeds a few times through a fine-meshed screen. You can pour the water out through a tea strainer or fine-meshed colander if you don't have screen. Place the drained seeds in a dark location, such as inside a cupboard, ensuring they are not sitting in water.
Days 3, 4, and 5: For the next 3 days, repeat the rinsing, draining and placing in a dark location.
To plant the seeds, you can use a takeout food storage container, produce container, margarine container, etc. You'll need drainage holes in the bottom. You can drill holes, or use a hammer and a thick nail to hammer holes. (To prevent the container from cracking, I placed the container on top of a piece of cardboard with a wooden board below the cardboard.)
Fill the container with approximately 1.5 inches of organic potting soil. Only use soil that indicates it's suitable for growing food. Mist the soil with water. Place the sprouted seeds in the soil, fairly close together, with the sprout facing upwards. Gently push the seeds into the soil. Mist with water. Cover with approximately 1 inch of loose, fine soil, and mist again.
Cover the soil with a layer of cardboard or newspaper, and place a weight on top, such as a book. Place in a dark location.
Days 7 and 8: For the next 2 days, once in the morning and once at night, remove the cover, mist lightly, recover, and put back in the dark location.
Day 9: In the morning, remove the cover, spritz with water, and place in a sunny location. Do not cover any more. Spritz again with water in the evening.
Day 10: The sprouted peas will be yellow in colour, until they receive more light and then quickly turn green. Continue spritzing with water in the morning and evening.
Day 11: One day later they have greened up and doubled in height. Continue to spritz with water two times per day.
Day 14: Approximately two weeks after the peas were first soaked in water, the shoots will be ready to cut for the first harvest.
Use scissors to cut the shoots above the first or second node. Rinse with water.
Pea shoots are best eaten raw, but may also be lightly sautéed or stir-fried. They are high in vitamins and minerals, and are generally eaten in small amounts.
It's best to have several containers growing at different stages. If you have a sunny location, a grow light isn't necessary. But if your sunlight is limited, you can add an LED grow light for 3-4 hours per day.
Remember to keep some peas from your summer garden so that you can dry them and keep as seed for pea shoots next winter!


Comments
Post a Comment